The GIGABYTE Z170X-Gaming G1 Review: Quad-SLI on Skylake, and now with Thunderbolt 3
by Ian Cutress on December 1, 2015 9:30 AM EST- Posted in
- Motherboards
- Gaming
- Intel
- Gigabyte
- PLX
- PLX8747
- Z170
- Thunderbolt 3
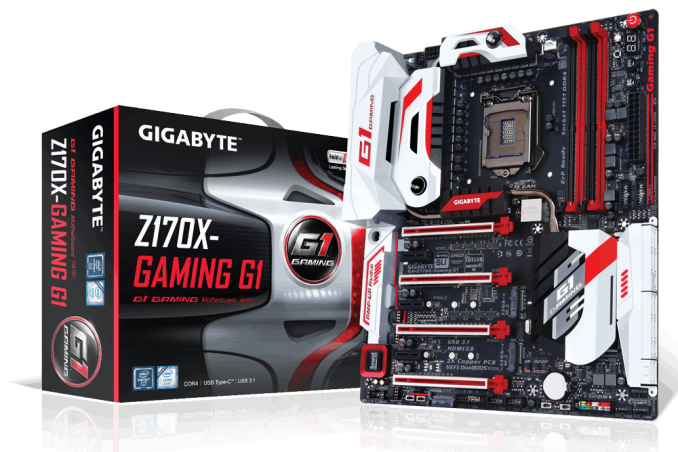
This is a review of a $500 motherboard for Skylake processors. For some readers, there’s going to an instant reaction of a series of question marks, confused emoji and an interrobang or two. You might ask why would anyone want to spend this much on a Skylake motherboard, when at this price point with a K-series processor, one could flip it around and go for a six-core Haswell-E and motherboard, get more cores and more PCIe lanes? The answer is usually simple – more cores only helps with certain non-gaming workloads, and the Z170 chipset has the potential to offer more than X99. With the GIGABYTE Z170X-Gaming G1, that means full quad-SLI while also using dual M.2 at PCIe 3.0 x4 speeds, with three Killer networks in tow, up to four USB 3.1 ports, ten SATA ports, and due to a recent update, all this comes with Thunderbolt 3 as well as numerous overclocking features and customizable lighting. It’s the first list of features on a motherboard that stretches the Z170 chipset to the limit.
Other AnandTech Reviews for Intel’s 6th Generation CPUs and 100-Series Motherboards
Skylake-K Review: Core i7-6700K and Core i5-6600K - CPU Review
Comparison between the i7-6700K and i7-2600K in Bench – CPU Comparison
Overclocking Performance Mini-Test to 4.8 GHz – Overclocking
Skylake Architecture Analysis - Architecture
Z170 Chipset Analysis and 55+ Motherboards - Motherboard Overview
Discrete Graphics: An Update for Z170 Motherboards - PCIe Firmware Update
100-Series (descending price):
The ASRock Z170 Extreme7+ Review ($240)
The MSI Z170 Gaming M7 Review ($230)
The ASUS Z170-A Review ($165)
To read specifically about the Z170 chip/platform and the specifications therein, our deep dive into what it is can be found at this link.
GIGABYTE Z170X-Gaming G1 Overview
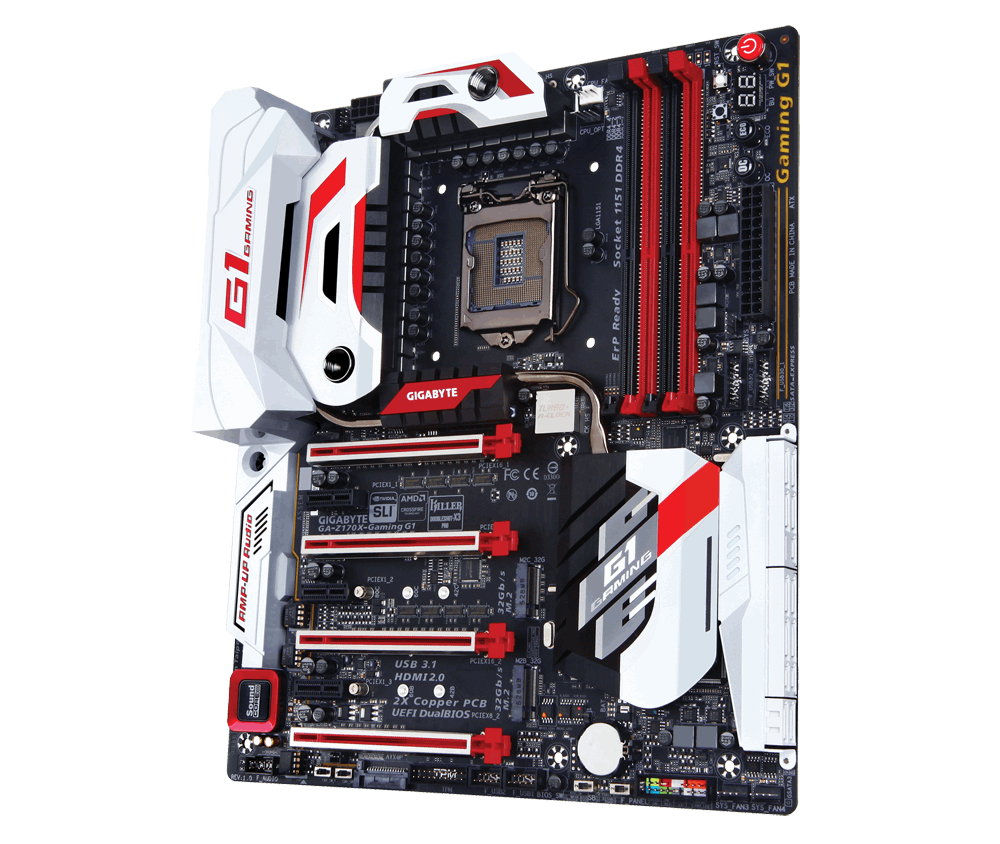
Try thinking of an ultimate motherboard. Unless you’re really excited by motherboards, or know how intricate they can be under the surface, motherboards do not exude a lot of enthusiasm but there is always a chance to be creative, especially as how the Z170 chipset enables 20 PCIe lanes in five sets, where each set can be organized as any combination of x1/x2/x4 up to a total of four. This allows additional ports, controllers and features that wouldn’t normally be possible. Of course, adding those ports and controllers ultimately costs money as well.
But what if money was not an object? Several M.2 ports, extra SATA ports, add in a few USB 3.1, M.2 or Ethernet implementations, or go whacky with some RAID controllers? Well apart from that last one, GIGABYTE seems to have you covered with the Z170X-Gaming G1.
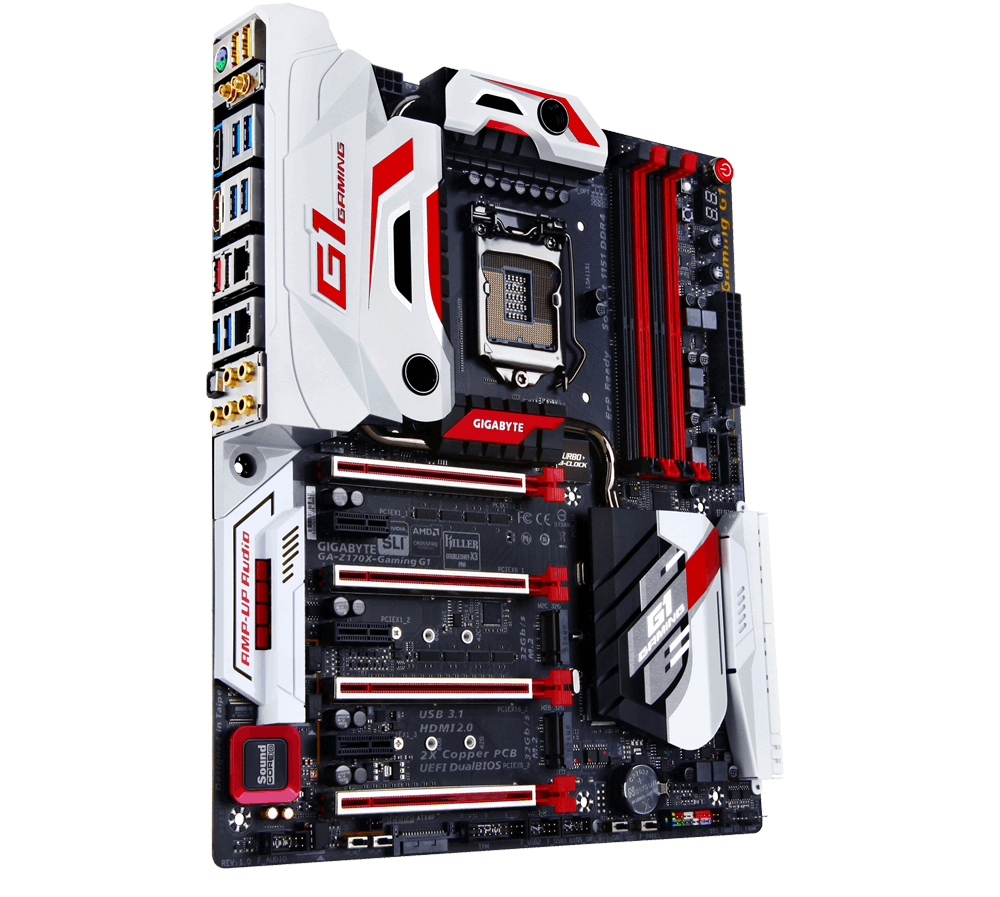
For sheer active functionality, especially as a gamer, you are covered. Here’s a basic list:
Dual Killer E2400 Network Ports + Killer AC-1535 2T2R 802.11ac WiFi with MU-MIMO support
USB 3.1-A and USB 3.1-C from Intel’s Alpine Ridge controller
A USB 3.1 front panel that coverts a SATA Express port into USB 3.1-A and USB 3.1-C
The USB 3.1-C on the rear panel, with updates, supports Thunderbolt 3
A PLX8747 PCIe multiplexing switch enables from x16/x16 to x8/x8/x8/x8 Support
10 SATA Ports (PCH and ASMedia ASM1061 Controllers)
3 SATA Express Ports
11 USB 3.0 Ports (Mix of PCH direct and via Renesas PCH Hubs)
Creative Sound Core 3D Audio and Software Suite
USB DAC-UP for clean USB power for DACs
Then there’s the passive functionality:
International Rectifier power delivery via 22 phases
Combination power delivery heatsink supporting air and water cooling
Enhanced Audio with gain switches and replaceable OP-AMPs
Performance Tuning IC for enhanced BCLK range
PCIe shielding for enhanced mechanical reinforcement for heavy GPUs
There are also nods to using black caps, increased gold count in the socket (15 micron) and other smaller differences, but this is starting to sound like a press release. The point is that the GIGABYTE Z170X-Gaming G1 comes and throws everything including the metaphorical kitchen sink at you.
The BIOS we tested had MultiCore Turbo enabled by default which gave high stock performance numbers but also increased the power consumption at load, which is the usual tradeoff. Due to the use of Creative’s audio, our audio tests had issues getting to work and the beta BIOS gave a large DPC Latency, however non-quick boot POST times were certainly ballpark, as was USB 3.0 and USB 3.1 performance.
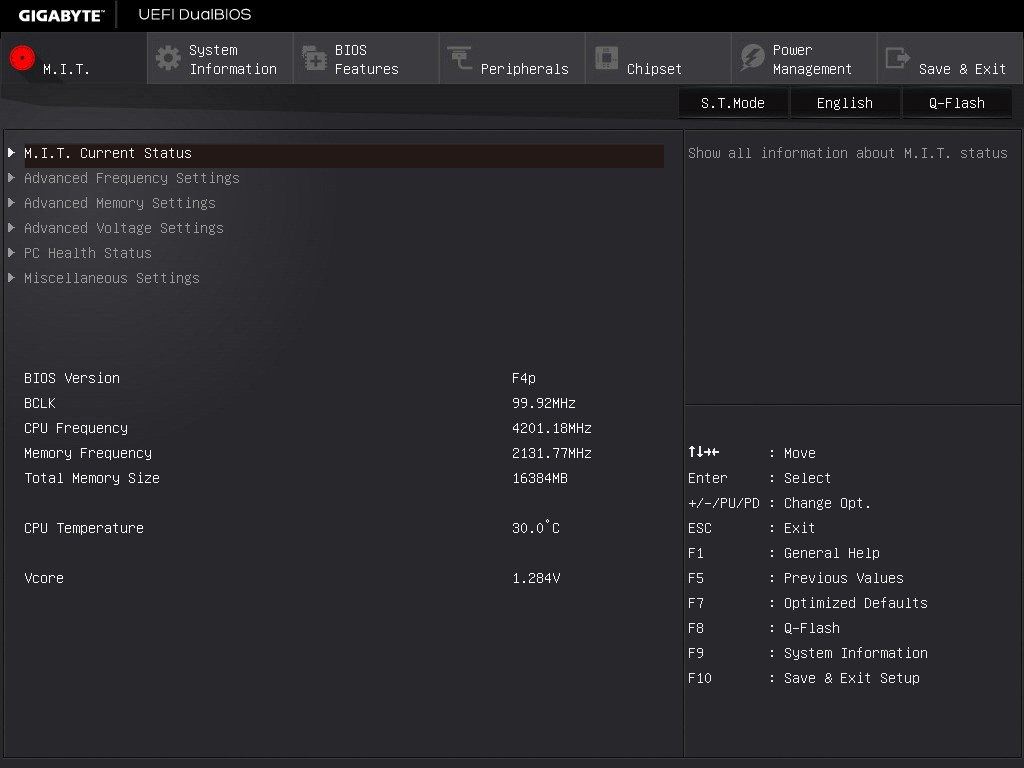
The GIGABYTE BIOS retains the look from X99 with iterative updates, but still feels indecisive about a clean classic look or a full HD mode – through the BIOS we achieved a 4.7 GHz overclock with the i7-6700K sample very comfortably at lower voltage and the same power as the stock settings, for just a few degrees extra. The software is perhaps where GIGABYTE has changed the most, with a new look APP Center and a more focused implementation of their original design.
All-in-all, $500 is a lot to spend on a Skylake motherboard. But for that cost, GIGABYTE provides a fair chunk of service that is hard to beat. Read on for the full review.
Quick Links to Other Pages
Page 2: In The Box and Visual Inspection
Page 3: BIOS
Page 4: Software
Page 5: System Performance (Audio, USB, Power, POST Times on Windows 7, Latency)
Page 6: CPU Performance, Short Form (Office Tests and Transcoding)
Page 7: Gaming Performance 2015 (R7 240, GTX 770, GTX 980)
Page 8: Conclusions
Quick Board Feature Comparison
| Motherboard Comparison | ||
| GIGABYTE Z170X-Gaming G1 | ||
| Socket | LGA1151 | LGA1151 |
| MSRP at Review | $500 | $230 |
| DRAM | 4 x DDR4 | 4 x DDR4 |
| PCIe Layout | x8/x8/x8/x8 (PLX 8747) | x8/x8 |
| BIOS Version Tested | F4p | 142 |
| MCT Enabled Automatically? | Yes | Yes |
| USB 3.1 (10 Gbps) | Intel Alpine Ridge 1 x Type-A 1 x Type-C |
ASMedia ASM1142 1 x Type-A 1 x Type-C |
| M.2 Slots | 2 x PCIe 3.0 x4 | 2 x PCIe 3.0 x4 |
| U.2 Ports | No | No |
| Network Controller | 2 x Killer E2400 1 x Killer 1535 2x2 802.11ac |
1 x Killer E2400 |
| Audio Controller | Creative SoundCore 3D | Realtek ALC1150 |
| HDMI 2.0 | Yes, via LSPcon | No |
GIGABYTE Z170X-Gaming G1 Overclocking
Experience with GIGABYTE Z170X-Gaming G1
The Z170X-Gaming G1’s overclocking functions come in a variety of formats. Most users will notice the operating system software Easy Tune first through the GIGABYTE App Center which offers a set of overclock values or an Auto Tuning mode.
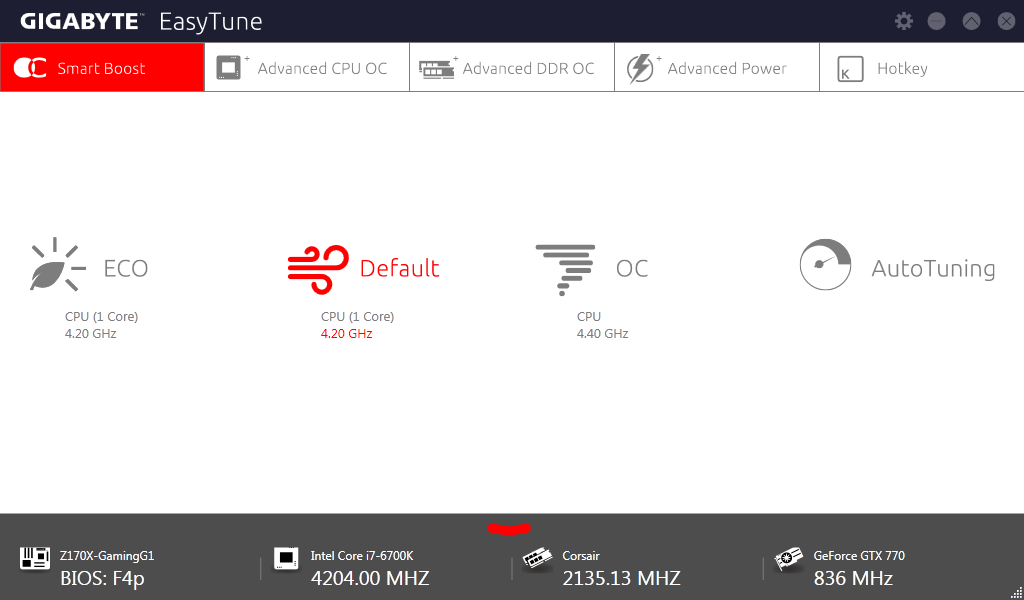
Within this interface, we also get sliding options for CPU, DDR and Power OC as represented by the tabs above the options, but also a hot-key setting. GIGABYTE also offers a simple interface of extreme overclockers through the website, but for most users the simple options will satisfy most. Admittedly the OC option at 4.4 GHz for our i7-6700K seems a little low for an automatic option, but there are more in the BIOS.
With the BIOS overclocking modes, GIGABYTE’s standard layout of splitting Frequency, Memory and Voltage into separate menus continues. Personally, this makes it a little frustrating when you want to change frequency and voltages at the same time because it requires navigating in and out of menus.
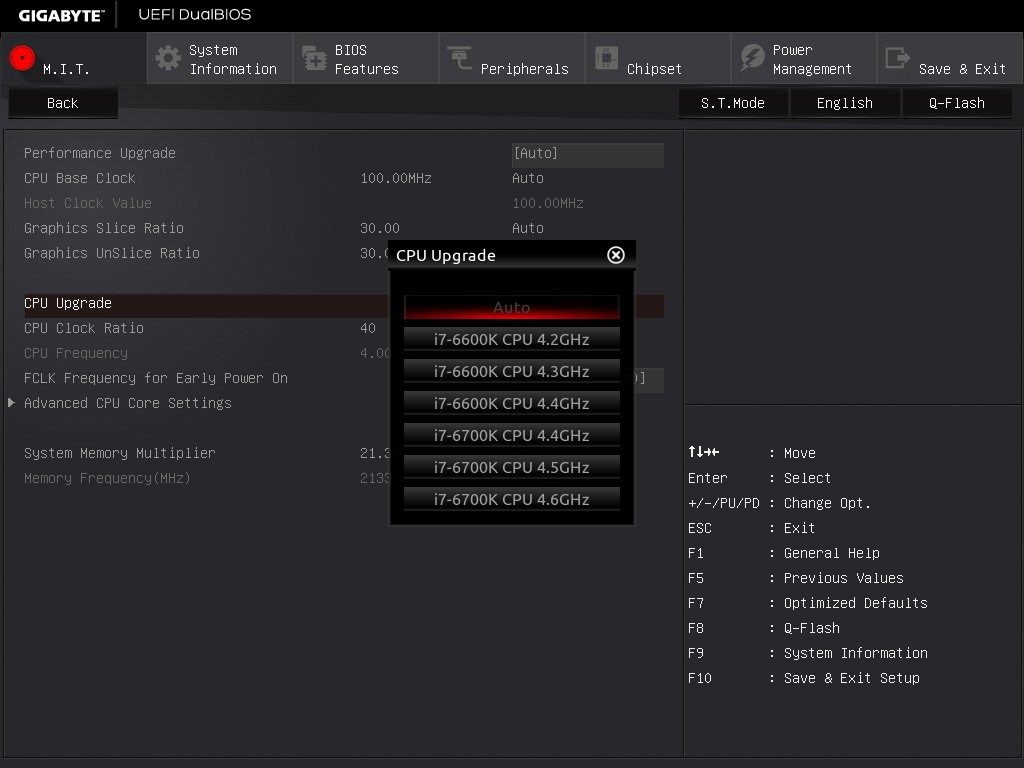
There are also a set of automatic CPU overclock options here as well under the CPU upgrade dropdown in the Frequency sub-menu.
Methodology
Our standard overclocking methodology is as follows. We select the automatic overclock options and test for stability with PovRay and OCCT to simulate high-end workloads. These stability tests aim to catch any immediate causes for memory or CPU errors.
For manual overclocks, based on the information gathered from previous testing, starts off at a nominal voltage and CPU multiplier, and the multiplier is increased until the stability tests are failed. The CPU voltage is increased gradually until the stability tests are passed, and the process repeated until the motherboard reduces the multiplier automatically (due to safety protocol) or the CPU temperature reaches a stupidly high level (100ºC+). Our test bed is not in a case, which should push overclocks higher with fresher (cooler) air.
Overclock Results
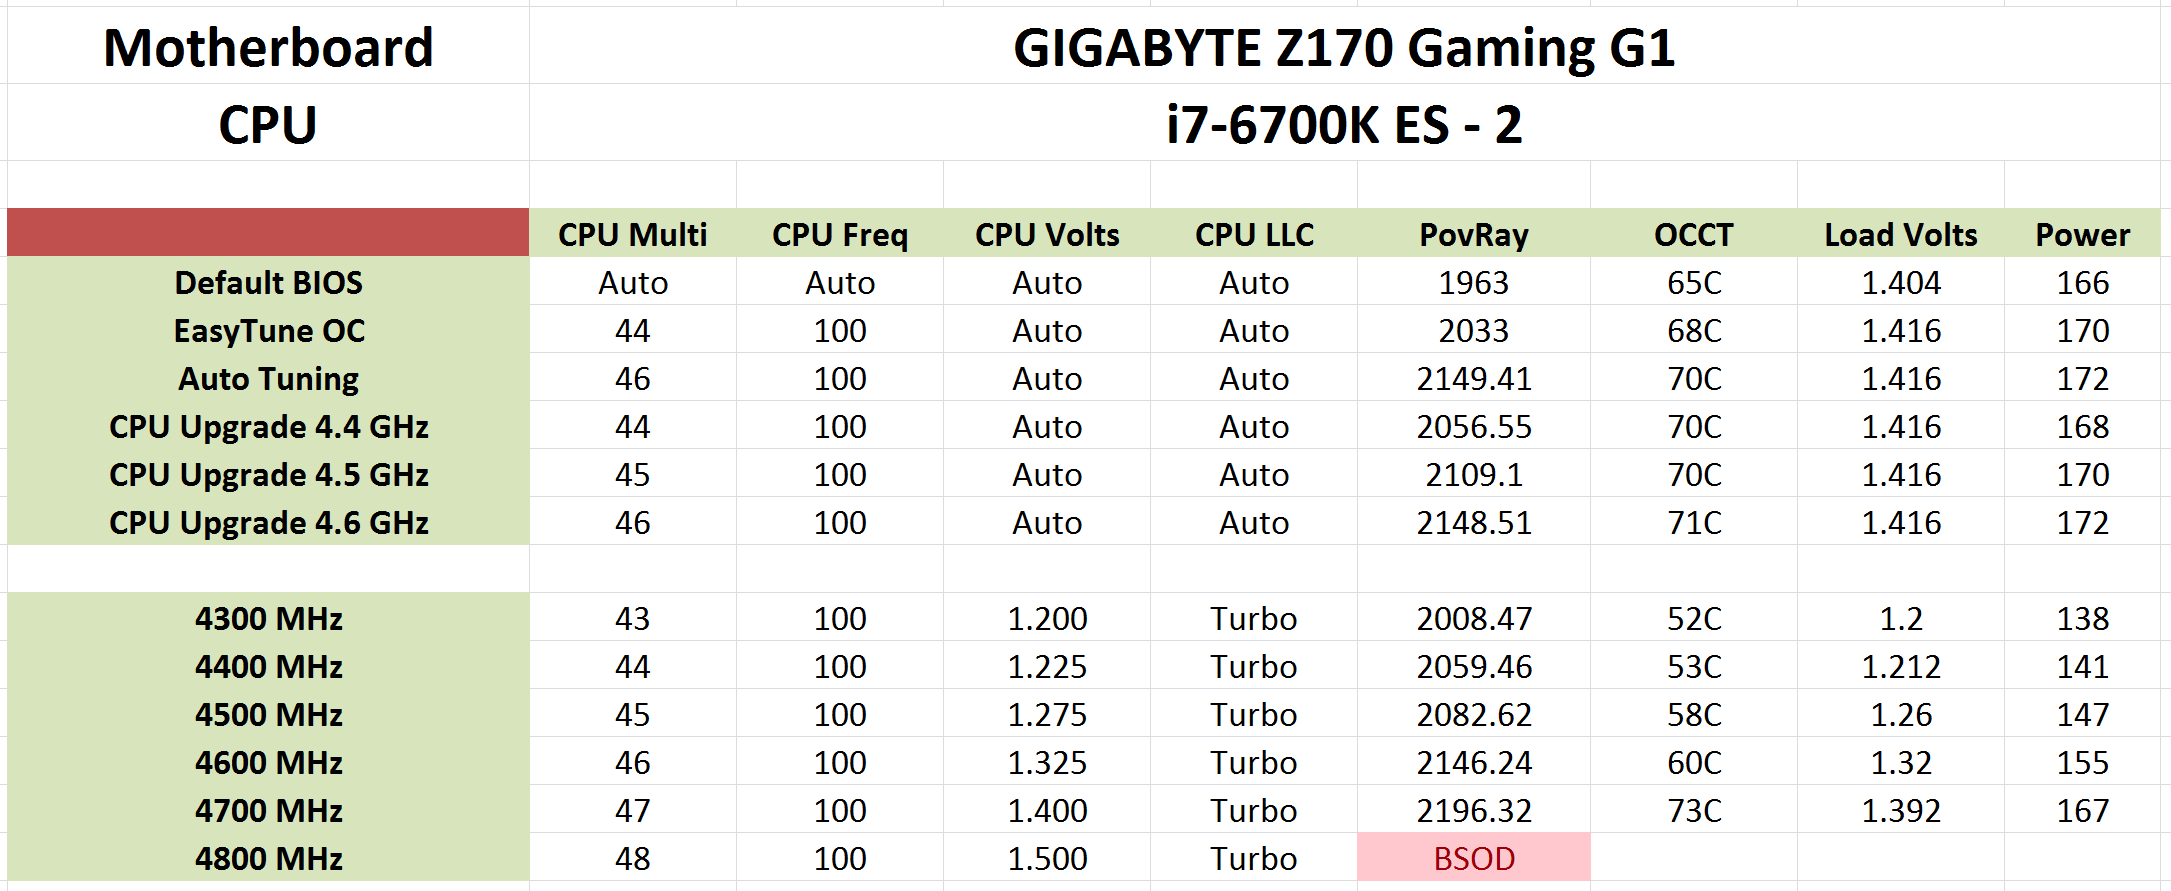
One of GIGABYTE’s quirks in recent generations is its lack to propagate automatic overclock settings. By this I mean that say I was to select the 4.6 GHz option, it would leave the CPU Voltage and Load Line Calibration listed as ‘Auto’ rather than their true values. This means that at POST it reads the CPU Upgrade option and then finds a look-up table of data, rather than when the CPU Upgrade option is applied to adjust the other registers so they are read directly at POST.
Nevertheless, if you want a pure CPU Upgrade option, our set of tests showed consistent load voltage of 1.416 volts. The default BIOS also showed a CPU voltage of 1.404 volts, due to MultiCore Turbo being enabled by default – this means that with the Z170X-Gaming G1, if users can overclock manually then we can hit 4.6 GHz and still be at a lower voltage, lower load temperature and lower power consumption than the stock MCT value and have higher performance.
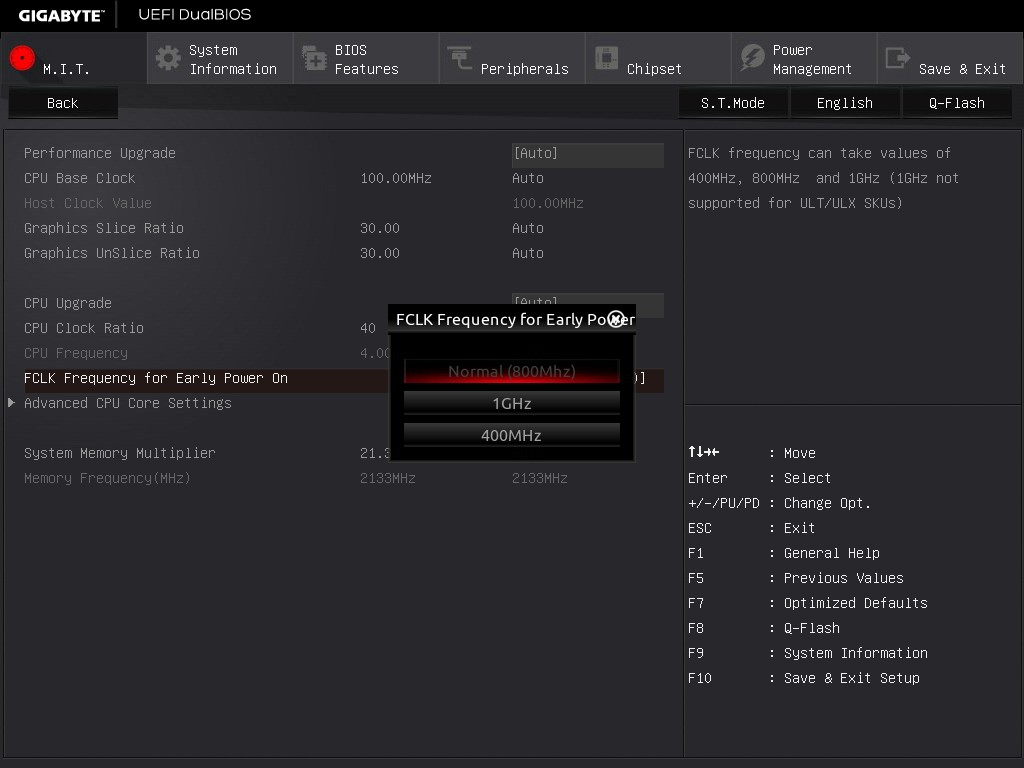
It is also worth noting that GIGABYTE’s FCLK settings are found in the Frequency sub-menu in the BIOS, with the 8x ratio being set by default:


67 Comments
View All Comments
wperry - Tuesday, December 1, 2015 - link
Stopped reading at the first sentence. I'm sure it's snazzy and all, but no.ImSpartacus - Wednesday, December 2, 2015 - link
Yeah, I'm struggling to believe that Anandtech just formally recommended a $500 consumer motherboard.I know that the classic response will be, "well it's just a recommendation for those that want to spend that much money." But the problem is that the recommendation didn't say that in fine print. Those kinds of reasonable caveats don't make it on the "Anandtech recommended!" stickers that get put on the motherboard boxes.
It just seems weird.
samsonjs - Thursday, December 3, 2015 - link
Who needs to be told that it might be out of their price range? I think that's something people can figure out themselves.JVC8bal - Thursday, December 3, 2015 - link
No one needs a Ferrari or Bugatti. They're way overpriced for a car. But they are exemplar fetes of engineering. Believe it or not, there's people whom it doesn't matter whether they pay $20k or $2M for a car - it's a drop in the pan for them.Chad - Sunday, January 3, 2016 - link
Meh... just get the Gigabyte GA-Z170X-UD5 TH instead... almost all of the features at less than half the price.Zak - Tuesday, March 1, 2016 - link
Hey, but it's got three Krap NICs!Mikemk - Tuesday, December 1, 2015 - link
Looks awesome. The black DIMMs sortof strand out though, they should be wire.nathanddrews - Tuesday, December 1, 2015 - link
Which page tests the quad-SLI feature? I can't find it.DigitalFreak - Tuesday, December 1, 2015 - link
That's part of the problem with Anandtech (and review sites in general). The guy that does the MB reviews usually isn't the guy who does the GPU reviews, so he won't have access to the equipment to do those kind of tests.Ryan Smith - Tuesday, December 1, 2015 - link
And to be fair I don't even have 4 matching cards for quad-SLI. It's a very rare setup.