The Motherboard
The motherboard is a very intimidating device for most first time builders, however it shouldn't. Once you get used to setting jumpers, your comfort level with installing a motherboard will increase tremendously. While preparing your motherboard for installation, it is best to do so on a wooden table, or even on the box of the motherboard itself. Do not prepare the motherboard on any carpeting or other static carrying surfaces. It is always best to proceed from this step forth with an anti-static strap on your wrist although one isn't required. Most motherboard vendors will provide one free of charge, just be sure to ask for it.
The first thing you want to do is remove the motherboard from its box and its anti-static bag, place the board itself on a hard surface which is covered by the anti-static bag you removed it from. Quickly inspect the board and make note of any protruding wires that appear to be soldered on as well as any damaged components. If the motherboard appears to be physically damaged, do not risk installation, call up your vendor and request a replacement. If everything appears to be ok, then you can proceed to the next step. Verify that you were sold the proper motherboard, double check the markings on the chipset as well as those on the motherboard's PCB (printed circuit board) itself.
Next, familiarize yourself with your User's Manual, there is no point in reading the entire manual word for word, but familiarize yourself with the introduction to the manual as well as the installation portion. It is always good to take a look at the troubleshooting section to identify any problems you may experience before they actually occur. Being prepared for a problem usually removes some of the intimidation building a new computer may provide you with. The next step involves setting jumpers, so if your motherboard is jumperless you can skip this next paragraph.
Keep in mind that a computer operates using a binary number system, meaning that in any one scenario you have two options, a 1 or a 0, on or off, up or down, right or left, and so on and so forth. In the case of setting up your motherboard, the same rule applies. In order to maintain compatibility with the many different types of processors and memory that are out on the market today, the motherboard is one of the most flexible devices in your system. With a few alterations of the current of electricity flowing through your board you can add support for new CPU's and other such things. This is exactly what setting a jumper does.
| A jumper is nothing more than a set of 2 or more pins which carries an electric current for the purpose of configuration. When a jumper is left unmodified, there is no current running through the two pins, therefore the circuit remains broken and the value of the setting is off. A jumper in this state is referred to as being Off or uncapped. So how do you change the state of a jumper? You turn it on by placing a plastic cap on the jumper that contains a small wire on the inside which connects the pins and allows current to run through them. In this case, the jumper is referred to as being on or capped. That is the most elementary example in which case there are only 2 pins to a jumper, however in some cases there may be 3 or 4 pins. In those cases the jumper settings are referred to according to the pins that remain on or capped. | 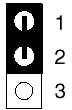 |
| For example, if jumper JP1, a 3 pin jumper, was supposed to be set at '1-2' as documented in the manual, pins 1 and 2 would be capped. However if it was supposed to be set at '2-3' then pins 2 and 3 would remain capped. The combination of the jumper settings on your motherboard is what configures your system on the lowest of levels. It is what controls the amount of voltage that should be fed to your CPU as well as the actual clock speed your CPU will run at. It is best to think of the jumpers on a motherboard as a wall of light switches. On this wall of light switches, a certain combination must be attained in order to turn on the lights you wish to have on. By changing the position of the light switches (placing them in the on or off position) you control the lights, and by properly modifying all of the switches as a whole you can turn on the lights you wish to have on. The same thing applies to configuring a motherboard, except for that the light switches represent jumpers and the desired lighting configuration represents the system configuration. Not too difficult now are they? Some motherboards even take it one step further by replacing jumpers with tiny switches known as dip-switches, these switches operate the same way jumpers do except for the fact that you don't cap the switches, you simply flip them on or off, just like a light switch. | |
With that out of the way, we can get to actually configuring the motherboard. The first thing you want to do is set the core voltage for your processor. Usually the markings on the top of your CPU will reveal the core and I/O voltages your processor was meant to run at. In the event that it doesn't, here is an abridged table of voltage settings for various processors:
Processor |
Recommended Voltage Settings |
| Intel | |
| Pentium Classic - P54C | 3.3v/3.52v (Single Voltage - Core=I/O) |
| Pentium MMX - P55C | 2.8v (Dual Voltage - I/O=3.3v) |
| Pentium II - Klamath | 2.8v (Dual Voltage - I/O=3.3v) |
| Pentium II - Deschutes | 2.0v (Dual Voltage - I/O=3.3v) |
| Pentium II - Celeron | 2.0v (Dual Voltage - I/O=3.3v) |
| Pentium II - Xeon | 2.0v (Dual Voltage - I/O=3.3v) |
| AMD | |
| K5 | 3.3v/3.52v (Single Voltage - Core=I/O) |
| K6 - 166/200 | 2.9v (Dual Voltage - I/O=3.3v) |
| K6 - 233 | 3.2v (Dual Voltage - I/O=3.3v) |
| K6 - 266/300 | 2.2v (Dual Voltage - I/O=3.3v) |
| K6-2 | 2.2v (Dual Voltage - I/O=3.3v) |
| Cyrix | |
| 6x86 | 3.3v/3.52v (Single Voltage - Core=I/O) |
| 6x86L | 2.8v (Dual Voltage - I/O=3.3v) |
| 6x86MX | 2.9v (Dual Voltage - I/O=3.3v) |
| M-II (PR300 and lower) | 2.9v (Dual Voltage - I/O=3.3v) |
Using the User's Manual as your reference guide, locate the voltage selection jumpers or dip switches and configure them properly as documented in the manual. The next step is to set your Front Side Bus (FSB) frequency as well as your CPU's clock multiplier. This should also be inscribed on your CPU, or documented in your User's Manual, in the event that it isn't here are some frequently used settings:
| Clock Speed | FSB Frequency (Bus Speed) | Clock Multiplier |
| 75MHz | 50MHz | 1.5 |
| 90MHz | 60MHz | 1.5 |
| 100MHz | 66MHz | 1.5 |
| 110MHz | 55MHz | 2.0 |
| 120MHz | 60MHz | 2.0 |
| 133MHz | 66MHz | 2.0 |
| 150MHz | 60MHz | 2.5 |
| 166MHz | 66MHz | 2.5 |
| 180MHz | 60MHz | 3.0 |
| 187.5MHz | 75MHz | 2.5 |
| 200MHz | 66MHz | 3.0 |
| 225MHz | 75MHz | 3.0 |
| 233MHz | 66MHz | 3.5 (1.5) |
| 266MHz | 66MHz | 4.0 |
| 300MHz | 66MHz | 4.5 |
| 300MHz | 100MHz | 3.0 |
| 333MHz | 66MHz | 5.0 |
| 333MHz | 95MHz | 3.5 |
| 350MHz | 100MHz | 3.5 |
| 400MHz | 100MHz | 4.0 |
| 450MHz | 100MHz | 4.5 |
Once again, with the aid of your user's manual, select the appropriate FSB frequency and clock multiplier for your CPU. Although it may be tempting to now, do not overclock your system until you get it up and running perfectly first, then you may attempt to overclock it. The next step is configuring all other jumpers that are specifically documented in the manual. If your motherboard has both AT & ATX power connectors on it be sure to set the appropriate jumper according to what type of power supply you will be using. If your chipset supports the asynchronous operation of your SDRAM clock speed, then be sure to set jumpers associated with that feature as well. The general rule of thumb here is to remember that if the manufacturer spent time printing info on how to set it, it is probably worth your attention.
Processor & Memory
Still working on the same surface that you were working on before, you want to next start on the processor installation. If you have a Socket-X based processor that interfaces with your motherboard using a ZIF (Zero Insertion Force) socket, then the process is a bit more detailed than if you're installing a Slot based processor.
If you're installing a socketed processor you should first check to see if any of the processor's pins have been bent during shipping or handling. If the answer is yes, then you need to make a quick judgement as to how extensive the damage is. If there are only a few pins that are bent, and the severity of the bends isn't too great then a tiny flat-headed screw driver will do the trick (but be VERY careful). If a great number of the processor's pins remain bent then you should probably contact your vendor and request a replacement as tinkering with your chip in any manner usually voids the warranty.
To install the processor in a ZIF socket, lift up the lever next to the socket so that it is now perpendicular to its original resting position. Line up the processor's pins with those on the ZIF socket, making sure that pin 1 (the pin on the grooved corner) on the processor matches up with pin 1 on the motherboard. With the processor lined up, rest it on top of the socket and lightly apply pressure to seat it in place. If the processor refuses your attempts to insert it into the socket, do not force it in (there is a reason the socket is referred to as a Zero Insertion Force socket) and double check to make sure that all of the pins are straight and that the processor is lined up properly with the socket then reattempt the installation. Depending on the layout of your motherboard/case you may or may not want to attach the CPU's heatsink/fan assembly now, a bit of thermal compound on the face of your CPU (not too much, it shouldn't be dripping off the sides of the CPU) will help thermal conductivity and cooling, so you may want to apply some of that as well.
To install a Pentium II class processor in a Slot interface, you will first want to attach the heatsink/fan assembly to the processor. Attach the CPU retention kit to your motherboard if it hasn't already been attached, and install the heatsink support (optional) device to the motherboard as well. If the CPU retention kit attaches to your motherboard via screws, do not over tighten the screws, just tighten them enough that the retention kit stays in place and doesn't wiggle around. After this has been complete, you can pop in the processor card until it rests firmly in the retention brackets and locks into place. The processor can only be installed in one direction so there is no chance of screwing up here.
Next comes the memory installation, this step can be performed after you install your motherboard in the case depending on, once again, the layout of your motherboard and the style of your case. All DRAM can only be installed one way, for 30 & 72-pin SIMMs, stick the module in at a 45 degree angle, and slowly push it to a 90 degree angle where it will click into place. 168-pin DIMMs should be installed at a 90 degree angle to the motherboard and pushed until it clicks into place.
With all that installed, go back and double check all jumper settings, all connections, and make sure that both the processor and memory are installed properly.


1 Comments
View All Comments
Anonymous User - Tuesday, September 16, 2003 - link
this web site is soxy.. i love it