| Socket Style: | Socket-7 |
| Chipset: | VIA VPX/97 |
| Cache: | 512KB/1024KB |
| Form Factor: | AT (w/ AT & ATX PS Connectors) |
| BUS Speeds: | 50 / 55 / 60 / 66 / 75 / 83 MHz |
| Clock Multipliers: | 1.5x / 2.0x / 2.5x / 3.0x / 3.5x / 4.0x / 4.5x / 5.0x / 5.5x |
| Voltages Supported: | 2.1 - 3.52v (0.1v increments) |
| RAM Slots: | 2 168pin DIMM
Slots (EDO/SDRAM) 4 72pin SIMM Slots (EDO/FPM) |
| AGP/PCI/ISA Slots: | 4 PCI Slots 3 ISA Slots (1 Shared / 3 Full Length) |
| BIOS: | AWARD PnP BIOS |
| PCI EIDE Controller: | GiG I/O 2 EIDE Channels 1 FDD Channel 2 Serial /1 EPP |
| With a footprint smaller than a sheet of paper it is obvious that the HOT-579 isn't an ATX motherboard, however the HOT-579 does feature both AT and ATX Power Supply connectors for those of you addicted to the ATX style of cases. Unlike some combo AT/ATX motherboards, the HOT-579 doesn't control its power supply source in the BIOS Setup, a very stupid decision on a manufacturer's part in the first place (how do they expect you to enter the BIOS setup if you can't power up the motherboard?), instead by setting a single jumper on the motherboard you can switch between an AT or an ATX power source. When setting up the HOT-579 be sure that this setting is configured properly, as it could lead to quite a few problems down the road while you're building/upgrading your system. | 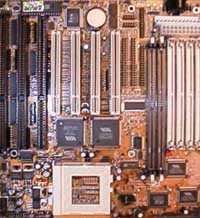 |
This jumper setting, along with the other settings necessary to get your system up and running are all documented (including the overclocked bus speed settings) in Shuttle's HOT-579 Installations Guide, basically a quick reference manual with all the filler junk cut out of it. The rest of the user's manual, in addition to other neat additions such as BIOS files, drivers, etc... are included on the CD-ROM packaged with all Shuttle motherboards.
The HOT-579 is what Shuttle likes to call a CPU-PnP motherboard, although the 579 doesn't meet the theoretical meaning of the term CPU-PnP it does have one nice feature for those of you not interested in doing too much overclocking, the ability to automatically configure your CPU's Core Voltage Setting. By placing a jumper block (a row of connected jumpers, supplied) across the voltage jumpers the HOT-579 reverts to the automatic voltage detection sequence and uses its "intelligent" mainboard features to accurately detect the proper voltage for your CPU. Now if you're running an un-supported CPU, such as one of the upcoming IDT C6+ processors (surprisingly enough the HOT-579 does include jumper settings for the current C6 chips) or the AMD K6-3D you may want to manually adjust the voltage setting. The HOT-579 takes this future expansion into account by providing you with a vast selection of core voltage settings to choose from, ranging from 2.1 volts to 3.52 volts in 0.1 volt increments. The HOT-579 is slowly appearing to be a very nice motherboard for overclockers... |
 |
For an AT motherboard the layout of the HOT-579 is outstanding. Not only did Shuttle manage to fit 4 PCI and 3 ISA slots onto a baby AT board a little wider than a standard sheet of college ruled paper, but they also ensured that ALL 3 ISA slots would accept full length cards. In doing this they did overlook the fact that only 2 of the PCI slots can be populated by full length cards, but the popularity of full length ISA cards seems to be much greater than full length PCI cards with users that would be interested in the HOT-579.
Like most Shuttle motherboards the HOT-579 features an AWARD PnP BIOS Setup, unfortunately in the Chipset Features Setup you can do a little more than change the colors on the screen. Its a bit more comprehensive than that, however full control over EDO/SDRAM timings is one thing that the HOT-579 seems to lack, not that you'll really need it though since the motherboard didn't seem to have any problem running at the 75/83MHz bus speeds with the Advanced Megatrends SDRAM used in the tests.
The stability of the HOT-579 is much greater than one would expect from simply looking at the motherboard, the HOT-579 managed to allow the test K6 system (using one of the first K6/233's which were very un-overclockable) to be taken up to 250MHz (83.3 x 3.0) using a 3.4v core setting and the fastest memory timings in the BIOS possible for the setup. The Cyrix 6x86MX-PR2/200+ that was used in the tests even made it up to a PR2/233+ setting (a very difficult feat to accomplish if you have one of the older 6x86MX chips) however the test system wasn't stable enough to complete a full run of Winstone 97/98.
The performance of the HOT-579 could have been better, however by all means the board isn't a poor performer. Un-overclocked, the HOT-579 is pretty average in the Winstone tests, but upping the K6's clock speed to 250MHz on this motherboard really pushed the limits of Winstone 97 and produced some Pentium II - like Winstone 98 scores. Why haven't I mentioned the Pentium MMX yet? Read on...
| When installing the HOT-579, particularly the Socket-7 Heatsink/Fan you should be very careful. The sole toroid on the motherboard is very flimsy, and happens to be positioned by the Socket-7 Heatsink attachment notch in addition to being surrounded by the majority of the capacitors on the motherboard (if you're wondering what in the world a toroid is, take a look at the picture to the right, it is the little green donut shaped object with wire coiled around it). When installing the Heatsink/Fan be careful not to accidentally damage the toroid or the capacitors around the CPU Socket. Another flaw in the layout of the HOT-579 is the placement of the Bus speed jumpers, they are placed in a corner generated by the meeting of the last DIMM slot and the first SIMM slot. Changing the settings on any of these three jumpers is a pain without the aid of a pair of trust needle nose pliers, just keep that in mind if you do decide to pick up a 579. | 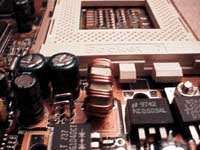 |
While the HOT-579 was very stable with the AMD K6 during the tests, it seemed to absolutely hate the Pentium MMX. At 233MHz there were no problems at all keeping the Pentium MMX running cool and stable, at 250MHz the system was overall, very stable, however pushing the system past 250MHz forced me to take the core voltage past 3.0v as well as tweak the BIOS timings a bit. It became quite obvious that the HOT-579 wasn't really intended to be a great Pentium MMX board although it is a fair performer with the chip, my suggestion would be for AMD owners to give the HOT-579 a try, and for Intel owners to shift their attention to some of Shuttle's other excellent designs.
Allows user to individually assign IRQs to PCI/Legacy ISA devices
Allows user to set Infrared Port IRQ
Autodetects PnP Peripherals after POST
| Shuttle HOT-579 Chipset Features Setup | ||||
| Item | Non - EDO | 66MHz Setting | 75/83MHz Setting | Safe Setting |
| DRAM Auto Configuration: | Disabled | Disabled | Disabled | Disabled |
| DRAM Timing Control: | Normal | Turbo | Normal | Normal |
| SDRAM Cycle Length: | 2 | 2 | 2 | 3 |
| SDRAM Bank Interleave: | 4 Bank | 4 Bank | 4 Bank | Disabled |
| Sustained 3T Write: | Enabled | Enabled | Enabled | Disabled |
| 2 Bank PBSRAM: | 2-1-1-1 | 2-1-1-1 | 2-1-1-1 | 3-1-1-1 |
| Read Pipeline: | Disabled | Enabled | Enabled | Disabled |
| Write Pipeline: | Enabled | Enabled | Enabled | Disabled |
| Cache Timing: | Fastest | Fastest | Fastest | Fast |
| Video BIOS Cacheable: | Disabled | Disabled | Disabled | Disabled |
| System BIOS Cacheable: | Enabled | Enabled | Enabled | Disabled |
| Memory Hole At 15MB Addr.: | Disabled | Disabled | Disabled | Disabled |
| OnChip USB: | Disabled | Disabled | Disabled | Disabled |
| USB Keyboard Support: | Disabled | Disabled | Disabled | Disabled |
This little addition to my review layout was put in here just so you all can have an idea of what brand of SDRAM I recommend and have tested with the board, just to avoid problems in the future if you decide to purchase the board.
Recommended SDRAM: Advanced Megatrends SDRAM
SDRAM Tested: 1 x 64MB Advanced Megatrends SDRAM DIMMs
Manufacturer: Advanced Megatrends
Purchase Web-Site: http://www.megacom.com


0 Comments
View All Comments